Tooele Ready Information
Make a Plan
In a disaster, you don’t rise to the occasion, you sink to your lowest level of preparedness. Your level of preparation will determine your reaction to whatever event happens and how well you will recover.
Personal and Family Readiness
Families can and do cope with disaster by preparing in advance and working together as a team. Knowing what to do is your best protection and your responsibility:
Questions to start asking:
- Where will your family be when disaster strikes? (They could be anywhere—at work, at school or in the car.)
- How will you find each other?
- How will you know if everyone is safe?
- How will we be able to communicate with each other?
- How will we get information about the disaster?
- Who might be able to help us?
- Who might we be able to help?
- Where will we go if we have to leave?
- What if we cannot get home?
- What supplies are the very most important for our comfort and safety?
Create a Disaster Readiness Plan
- Meet with your family and discuss why you need to prepare for disaster.
- Explain the dangers of fire, severe weather, and earthquakes to children. Plan to share responsibilities and work together as a team.
- Discuss the types of disasters that are most likely to happen. Explain what to do in each case.
- Develop a plan to communicate. Ask an out-of-state person to be your “family contact.” After a disaster, it’s often easier to call long distance. Other family members should call or text this person and tell them where they are and their condition. Everyone must know your contact’s phone number.
Make sure everyone knows how to text. Know how you will receive emergency messages from authorities.
Know how you will communicate with neighbors, school, work, and others. Learn about the Red Cross Safe and Well Program at www.redcross.org/safeandwell to communicate with loved ones after a disaster. Send text messages instead of phone calls because text messages may get through better.
- Post emergency telephone numbers by phones (fire, police, ambulance, etc.)
- Teach family members when to call 911 and what to say
- Discuss what to do in an evacuation. Pick two places to meet:
- Right outside your home in case of a sudden emergency, like a fire.
- Outside your neighborhood in case you can’t return home. Everyone must know the address and how to get there. Determine the best escape routes from your home.
- Find two ways out of each room.Find the safe spots in your home for each type of disaster.
 Be familiar with names of roads and know designated evacuation routes. Keep a map of the local area with this plan
- Be familiar with warning systems. Sign up to get alerts and notifications from Emergency Management
- Show family members how, when, and where utility shut offs are
- Install smoke detectors on each level of the home, especially near bedrooms. Check smoke detectors and carbon monoxide detectors regularly
- Conduct a home hazard hunt. Mitigate potential hazards and risks
- Know who in your neighborhood might need help in preparing and responding in a disaster and include them in your plans. Know others in your neighborhood who might be able to help your family if you were gone.
Planning for Pets and Animals
Make plans for your pets and animals. In case of an evacuation, remember that pets are not allowed in public shelters or some hotels. Arrange a safe-haven for your pets in the event of evacuation. DO NOT LEAVE YOUR PETS BEHIND. Remember, if it isn’t safe for you, it isn’t safe for your pets. They may become trapped or escape and be exposed to numerous life-threatening hazards. It is imperative that you have determined where you will bring your pets ahead of time:
- Contact your veterinarian for a list of preferred boarding kennels and facilities.
- Ask your local animal shelter if they provide emergency shelter or foster care for pets.
- Identify hotels or motels outside of your immediate area that may accept pets.
- Ask friends and relatives outside your immediate area if they would be willing to take in your pet.
Other Planning Considerations
- Check insurances know what will be covered and what will not
- Know the Special Needs for your family – Establish a personal support network of friends, relatives, health-care providers, co-workers, and neighbors who understand your special needs. Write down details about: accommodation needs, insurance information, allergies, medical conditions, emergency contacts, medications, family medical history, recent vaccinations, health screenings, and surgeries
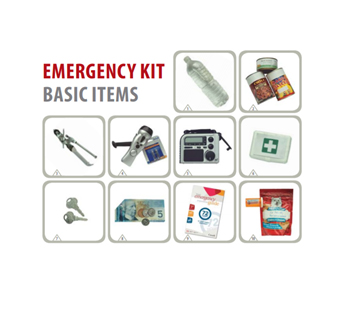
Get a Kit
Make sure everyone has their own supplies in their own kit incase family members are seperated
Review the information below. Gather the needed supplies that are listed. You may need them if your family is confined at home or compelled to evacuate. You may also need more than one type of kit, plan accordingly.
- Place the supplies you would most likely need for an evacuation in an easy-to-carry container. Possible Containers Include: • A large, covered plastic container• A five-gallon bucket • A backpack. • A suitcase with wheels • A duffel bag.
- Try to have enough supplies for a minimum of four days.
- Make sure everyone has their own emergency supplies kit.
➤ 7 Basics of a Disaster Supplies Kit:
- Water
- Food
- First Aid Supplies
- Clothing and Bedding
- Tools & Emergency Supplies
- Special Needs items and Medications
- Important documents
***Remember to include the things you need and use on a regular basis
Every family member should have a disaster supply kit with essential food, water and supplies for at least four days. This kit should be kept in a convenient place, ready to “grab and go” in case you have to leave your home quickly because of a disaster, such as a flash flood or fire. Make sure all household members know where the kits are kept. Update kits regularly.
Water
- Store water in plastic containers, such as soft drink bottles. Avoid using containers that will decompose or break, such as milk cartons or glass bottles. A normally active person needs to drink at least two quarts of water each day. Hot environments and intense physical activity can double that amount. Children, nursing mothers and those who are ill will need more.
- Store atleast one gallon of water per person, per day. Households should have a minimum of a two week supply of water.
- Keep at least a four-day supply of water per person in your disaster supply kits, two quarts for drinking, two quarts for food preparation/sanitation.
- Don’t forget water for your pets.
- Treat all water if unsure of its purity, before using it for drinking, food preparation, or hygiene. Before treating, let any suspected particles settle to the bottom or strain through layers of paper towels or cloth.
- Water can be safely treated by: 1. Boiling for 10-12 minutes, let the water cool before drinking, or 2. Adding 6-10 drops of bleach per gallon of water (don’t use color-safe bleach). More bleach is not better, too much can make you ill. Make sure all stay hydrated, as dehydration is not a problem you want to have. You can never store too much water. Rotate your water supply periodically to keep your supply fresh.
- 1 gallon per person per day (at minimum)
- Obtain a good water filter
Food and Food supplies
Store at least a four-day supply of nonperishable food
- Select foods that require no refrigeration, preparation, or cooking and uses little or no water.
- Choose foods that your family will eat. Avoid foods that will make you thirsty.
- If you must heat food, pack a can of Sterno. Select food items that are compact and lightweight.
- Include a selection of the following foods in your Disaster Supplies Kit:
- Ready-to-eat Canned Food: meats, beans, vegetables, fruit, pasta, rice, cereal
- Canned soup (if powdered, store extra water)
- Beverages (bottled, canned, boxed): juices, water, soda, coffee, tea, powdered drink mix, etc.
- Staples: sugar, flour, salt, pepper, baking soda, baking powder, spices
- Carbohydrates: Cereals, Breads, Granola bars, trail mix, crackers, dried fruits, breakfast bars
- Proteins: Peanut butter, nuts, meats, protein bars
- Sugars: Syrup, non-melting candy, cookies
- Vitamins
- Special foods (for infants, elderly, special diets):_______________________________________
- Comfort/stress foods: cookies, hard candy, sweetened cereals, instant coffee, hot chocolate, etc
- Other:
- Cooking supplies,
- Mess kit or
- Plate, bowl, cup, spoon, fork, knife
- Utility knife,
- manual can opener,
- small cook stove
- pot for cooking
- paper towels
First Aid Supplies
Assemble a first aid kit for your home, one for each car, and a small one to carry with you.
First aid kits are a must have for every family. First aid kits are necessary so that you can treat ailments and injuries that happen at home or while traveling. From the minor cut, to the more serious injury, a first aid kit can help reduce the risk of infection or the severity of the injury. First aid kits include a variety of items that will help treat cuts, scrapes, and injuries including sprains, burns, and other ailments that are common. You can either buy a prepared first aid kit or you can prepare your own first aid kit using the list below. Make sure to put your first aid kits in easy to access places so that anyone can access the kit in the case of an injury.
Many injuries are not life-threatening and do not require immediate medical attention. Knowing how to treat minor injuries can make a difference in an emergency. Consider taking a first aid class to know how to treat injuries and utilize all the supplies in a first aid kit, but simply having a first aid kit can help you stop bleeding, prevent infection, and assist in decontamination. First aid kits can range from simple to very detailed. A small simple first aid kit should be carried to aid in small emergencies such as a cut or a scrape. When something more severe happens, having the right skills and equipment will help to give first aid. At its most basic, first aid is the initial assistance given to a victim of injury or illness. Having a kit on hand will help you and could potentially save a life.
A more detailed first aid kit should be kept at home, while a smaller sized detailed kit should be kept in the car for emergencies away from home.
A Basic Kit should include:
- Sterile adhesive bandages in assorted sizes
- 2-inch sterile gauze pads (4-6)
- 4-inch sterile gauze pads (4-6)
- Hypo-allergenic adhesive tape
- 40-inch triangular bandages (3-rolls)
- 2-inch sterile roll bandages (3-rolls)
- 3-inch sterile roll bandages (3-rolls)
- Scissors and tweezers
- Epi pen (if allergic to bee stings)
- Small Sewing kit
- Moistened towelettes/wet wipes
- Antiseptic soap
- Antiseptic solution – iodine compounds
- Antibiotic Ointment
- Hydrocortisone Cream
- Thermometer
- Tongue depressors (2)
- Tube of petroleum jelly (Vaseline or lubricant)
- Safety pins in assorted sizes
- Cleaning agent/soap
- Vinyl gloves (2 pairs)
- Scissors
- N95 Masks 6+
- Paracord or rope
- Superglue
- Matches
- Light Source
- Magnifying glass
- Fels naphtha soap- to wash off poison Ivy, oak or sumac from skin and clothes (also a great clothes detergent)
- Entertainment and comfort candy
- Ibuprofen (Advil)
- Acetaminophen (Tylenol)
- Aspirin
- Anti-histamine
- Imodium/Loperamide
- Sudafed (or an equivalent)
- Throat lozenges
- Cold/Flu medications
- Bismuth tabs
- Oral rehydration
- Dramamine
- Stool softener (laxative)
- Miconazole/Anti-fungal cream
Over-The-Counter Medications and Prescription Medications
- Sun screen
- Insect repellent
- Caladryl or generic equivalent
- First aid manual
- Rubbing alcohol
- Cotton balls
- Witch Hazel for bug bites and hemorrhoids
- Mylar Blankets (2)
- List of any family members with allergies and treatment
- Contact information for family doctor, dentist, and emergency contact numbers for family members (work and cell)
- Small tool set
- Duct Tape
- Thermometer
- Q-Tips
- Large all-metal trauma shears
- Nail clippers
- Molefoam
- Moleskin
- 2nd skin
- Medical tape
- Other Wound Treatment Tools
- Out box of Nitrile gloves, LOTS and LOTS
- Irrigation syringe
- Sterile gauze pads, 5+
- Steri strips and butterfly bandages to close minor lacerations
- Multiple size Ace Bandages, x2
- Triangle bandages, x2
- Steri-strip or butterfly closures, 3+
- Maxi Pads and tampons- multi use materials
- Sam-splint / moldable foam splint
- Israeli bandage
- Suture kit
- Iodine
An Advanced First Aid Kit should also Include:
Treating wounds is not always a simple ordeal – especially trauma – and it is often a job that is best left to the professionals. But in a survival situation, it may be your responsibility to treat these injuries to the best of your ability. Realistically, outside of a hospital, no one is prepared for every medical emergency. Wounds can be ugly. Trauma can be horrifying. But here are some tools that will help prepare you for both:
Blister Treatments
Clothing and Bedding
Staying warm and dry is important to your safety and health. Having the correct type of clothing will help you stay well and be able to perform tasks better.
- Include at least one complete change of clothing that can be layered, and good sturdy footwear per person
- Have multiple pairs of socks to reduce blisters and other foot problems
- Items to help keep you warm and dry should also be included
- Keep all clothing and bedding from getting wet
- Change of clothes (according to season and work)
- Socks
- Underclothing
- Cap
- Winter hat and Winter Gloves
- Thermal underclothing
- Sunglasses
- Watch
- Jacket
- Sweatshirt
- Rain Gear
- Work Gloves
- Sturdy shoes or boots
- Blankets
- Sleeping Bag
- Travel Pillow
- Plastic Sheet or Tarp
Tools and Supplies
Small tools and other supplies will help you be more comfortable and safe depending what situation you may find yourself in.Items such as work gloves, safety goggles, a flashlight or headlamp, and extra batteries will help keep you from getting injured.
- safety goggles,
- gloves
- N95 mask
- Sturdy shoes or boots
- Whistle
LIGHT
- a flashlight or headlamp, and extra batteries
- Solar Powered lights
- Lantern
- Candles
- Light Sticks
COMMUNICATION
- Battery powered radio
- Family radio service radio
- Permanent Marker
- Paper, Pencil, Pen
SHELTER
- Tube tent
- Emergency blanket
- Large Tarp
- Tent if there is space
- Shut-off wrench to turn off household gas and water
- Whistle
- Binoculars
- Axe/Hatchet
- Saw or chainsaw
- Crowbar
MISC SUPPLIES
- Cash in small bills and coins
- Plastic sheeting
- Plastic storage containers and bags
- Plastic Garbage and heavy duty bags
- Plastic zipper type bags different sizes
- Extra set of car and house keys
- Map of the area (for locating shelters and evacuation routes)
- Scissors
- Comfort items
- Matches in a water proof container or lighter
- Candles
- Propane heater
- Aluminum foil
- Fire extinguisher: small canister ABC type
POWER
- Batteries
- Rechargeable Batteries
- Solar and other charging tools for electronic devices
- Generator (keep far away from house due to carbon monoxide)
TOOLS
- Utility knife or multi tool
- Small basic tool set
- Hammer
- Small shovel
- Tape/duct tape
- Compass
- Rope or paracord
- Small sewing kit
- Entertainment
SANITATION
- Toilet paper,
- Towelettes,
- Soap,
- Hand sanitizer,
- Liquid detergent,
- Feminine supplies and
- Personal hygiene items (toothbrush, toothpaste, floss, nail clippers, nail file, chap stick,
- Shampoo, conditioner)
- Personal Wipes
- Tissues
- Deodorant/Antiperspirant
- Bucket with tight fitting lids
- Heavy Duty Garbage sacks
Medications and Special Needs
Every person has different needs. Some need eyeglasses to see, some need an oxygen machine to breathe, others may need insulin or certain medications. Children have certain needs. Babies have different needs and even adults have differing needs according to age. All of these needs should be considered, and supplies added to the emergency supply kit.
MEDICATIONS
- Week supply of Prescription medication in original pill bottle if possible
- Insulin and supplies
- Other over the counter medication that is needed
SPECIAL NEEDS
- Eyeglasses
- Extra clothing
- Entertainment
- Toys
- Extra snacks and treats
BABIES
- Diapers and Diaper changing supplies
- Formula
- Baby Food and supplies
- Clean up cloths and supplies
- Contacts, case, saline solution
- oxygen machine
- C-pap machine
- Hearing Aids and extra batteries
- Walker/ Wheelchair
CHILDREN
- Comfort items
- Diaper Rash Ointment
- Extra Clothing
- Extra pacifiers
- Washcloths
- Bulb syringe
- Baby medications
- Extra blankets
- Small comfort toys
Important Documents
Should you need to leave your home and are not able to return, it is wise to have important documents relating to your life and insurance to help in the recovery process after the event. Many people don’t realize how much of our lives are in paper and how important those papers are, especially when trying to access resources. Make sure you have copies with you and have a set of copies housed somewhere off premises.
- Insurance Policies
- Bank Account Information
- Mortgage Information
- Loan Information
- Tax Returns
- Pension Plans & Retirement Benefit Information
- Investment Information
- Will and Trust information
- Power of Attorney Information
- Safe Deposit Box location and location of keys
- Professional Advisor Contact Information
- Proof of Identity & Relationships
- Household Utility Information
- Internet site, social media, and e-mail passwords
- Medical History
- Home Inventory& Appraisals
- Family History
- Important Contact information for work, school, daycare, church, etc.
Important Reminders ➤ Store your kits in a convenient place known to all family members ➤ Keep a smaller version of the Disaster Supplies Kit in the trunk of your car and at your office ➤ Keep items in airtight plastic bags ➤ Change your stored water supply yearly so it stays fresh ➤ Replace your stored food every six months ➤ Evaluate your kits and family needs at least once a year. Replace batteries, update clothing, etc. ➤ Ask your physician or pharmacist about storing prescription medications.
Everyday Supplies
- Wallet
- Purse
- Phone
- Charger
- Charging Cord
- Medications
Prepare Your Vehicles
Vehicles are important to our lives. They take us to work, school, church, shopping, events, and take us on our vacations. Because they are a critical part of our everyday lives it is important to have some supplies with you, just in case you are stranded somewhere, or your car unexpectedly cannot run.
If you are evacuating an area or you are stranded in your vehicle, you should make sure your vehicle is prepared to help you leave safely. Use the vehicle checklist to help you create a vehicle emergency kit for each vehicle. Prepare now by storing these items in your vehicle and be sure to rotate the items periodically. Keep vehicles fueled and in good condition by keeping them tuned with regular maintenances checks. Always check weather and road conditions before a trip.
VEHICLE KIT
- Water
- Food (Snacks, High Calorie bars, but food that doesn’t make you more thirsty)
- Cash (Small bills and coins)
- Jumper Cables
- Tire Gauge
- Extra fuses and lightbulbs
- Basic First Aid Kit
- Plastic Sacks
- Flares or Roadside Triangles
- Small Tool Set
- Blankets
- Jackets
- Good walking shoes
- Small Shovel
- Kitty Litter or Sand
If you must evacuate your home in a crisis, plan for the worst-case scenario. Even if you think you may be gone for only a day, assume that you may not be allowed to return for several weeks. When recommendations for evacuation have been announced, follow the instructions of local and state officials.
PET SUPPLIES
Get current photos of you with your pets and descriptions of your pets to help others identify them in case you and your pets become separated—and to prove that they are yours once you’re reunited.
- Make sure all pets wear collars and tags with up-to-date identification information. Your pet’s ID tag should contain his name, telephone number and any urgent medical needs. Be sure to also write your pet’s name, your name and contact information on your pet’s carrier.
- Written information about your pets’ feeding schedules, medical conditions and behavior issues along with the name and number of your veterinarian in case you must board your pets or place them in foster care.
- Food and Water for a week
- Leash or harness
- Pet Carrier
- Food
- Collapsible bowls
- Litter box
- Kitty litter
- Scoop
- Plastic sacks
- Medications and medical records
- Grooming items
- Play and chew toys
- Pet first aid kit
Be Informed
Disasters come in all sorts and sizes. There is no one size fits all when it comes to disasters. Everyone will be affected differently, yet will experience the same disaster. Preparedness is very much a personal endeavor because of this. It is important to know what can happen in your area and what protective actions you should take during different types of emergencies. Below is a list of various events that might be experienced. Read through all the events and protective actions even if you think those kinds of things don’t happen locally, remember that you travel to different areas that might have different types of events. It is always better to know what to expect.
Part 1- Know What Could Happen
Know which the types of disasters that may affect your family: (Don’t forget to think about the disasters you might encounter as you travel)
Natural Disasters
- Earthquake
- -Structural Failures
- Hazardous Weather
- -Winter Storms
- -Windstorms & Tornados
- -Thunderstorms & Lightning
- -Flooding
- -Extreme Heat/Drought
- Fire
- -Home Fire
- -Wildland Fire
- Landslides
- Volcanoes
- Hurricanes
- Tsunamis
Human Caused or Technological Disasters
- Utility Failures
- -Power
- -Gas Leaks
- -Communications
- -Water & Sewer
- Hazardous Materials
- -Household Chemical Emergencies
- -Hazardous Materials Incidents
- -Radiation Emergency
- Terrorism
- -Active Shooter
- -Cyber Safety
- -Chemical Attack
- -Biological Attack
- Transportation Failures
- Public Health Threats
- -Infectious Diseases
- Infrastructure Failure
Part 2- Know how to communicate with family and others
![]()
A communications plan with your neighbors and local leaders is also part of being informed.
Sign up to be notified of weather events, major emergencies, and active county events.
Know and understand the different ways that authorities will communicate information to the public through the warning system and the Emergency Broadcast System.
Be familiar with warning systems
Local Warning Systems
- Tooele Alerts
- Social Media (Tooele Emergency Management Facebook and Twitter)
- Highway Message Boards
- Sirens
- Route Alerting through Police and EMS
- Telephone calling trees and neighborhood communications
Regional Warning Systems
- Television and Radio Stations KSL 5 and KSL 1160 AM and 102.5 FM
- Tone Alert Radios (National Weather Service
- 511 Local Road Conditions Information
Part 3- Know what protective actions to take before, during, and after an emergency
Protective Actions
Several types of disasters may force you to evacuate your home. If you are told to evacuate, take the following steps:
- Immediately gather family members and neighbors needing assistance.
- Grab emergency supplies kits, medications, and important documents.
- Get pets and their kits.
- Lock your house and leave in private vehicle.
- Listen and obey authorities through messaging from TooeleAlerts and other notification systems. Tune car radio to EAS station, KSL 1160 AM or KSL 102.7 FM.
- Follow directions and proceed to a safe area.
- Expect traffic delays, remain calm, and drive safely.
- Evacuee Reception Centers will be opened in safe areas.
- Listen carefully to instructions by local officials. Evacuate immediately if told to do so.
- Wear appropriate clothing and sturdy shoes.
- Always keep gas tanks at least half full. Gas stations may be closed during emergencies.
If you go to a shelter, notify staff of any special needs you may have. They will try to accommodate you as much as possible, but be aware that they have limited supplies and are not equipped to deal with special needs right away.
Be prepared to leave your home if:
➤ There is a fire in your home
➤ Your area is without electrical power or water for an extended period of time
➤ There is a chemical emergency affecting your area
➤ Flood water is rising
➤ A wildland fire is burning near your home
➤ Your home has been severely damaged
➤ Local officials tell you to evacuate
Evacuations are more common than many people realize. Hundreds of times each year transportation and industrial accidents release harmful substances, forcing thousands of people to leave their homes for unspecified amounts of time. Fires and floods cause evacuations even more frequently.
Shelter-in-place simply means staying inside your home or business. During an accidental release of toxic chemicals or emergencies involving hazardous materials where air quality may be threatened, sheltering-in-place keeps you inside a protected area and out of danger.
If shelter-in-place is necessary, you will be notified by local authorities. If you are asked to shelter-in-place, take the following steps:
- Take your children and pets inside immediately. If there are toxic chemicals or hazardous materials involved, while gathering your family, cover your mouth and nose with a damp cloth to provide a minimal amount of coverage.
- Close doors and windows, as well as the fireplace damper.
- Turn off heating and air conditioning systems.
- Take family into pre-selected shelter room with emergency supplies kits and go to an above ground room (not the basement, if a chemical incident) with the fewest windows and doors.
- Wet some towels and jam them in the cracks under the doors. Seal doors, windows, vents and other openings with plastic sheeting and duct tape. Close drapes or shades over windows. Stay away from windows.
- Turn on battery-operated, AM/FM radio. Listen for information from officials.
- You may leave shelter when instructed by emergency officials.
- Once you are told to stop sheltering-in-place, vent your house by opening windows and turning on fans.
Create a shelter-in-place kit: • Battery-operated AM/FM radio • Precut and labeled plastic for doors and windows of your shelter area • Duct tape and scissors • Towels or rags • Water bottles and granola bars or non-perishable, no-cook food (enough for everyone sheltering).
There may be a reason to shelter in place that doesn’t involve a chemical or hazardous materials incident. Authorities may ask you to stay in your house while they are dealing with high tense events or searching for someone. Always follow their direction for your safety.
Be sure everyone in your household knows where to find shelter from all hazards that may affect your area.
This protective action is to stand-by for more information. At the onset of an emergency or disaster you and your family may not be involved in the initial evacuation or shelter-in-place orders. However, emergencies and disasters can escalate, at which time emergency officials may announce additional evacuation or shelter-in-place orders. To be alerted to the potential changes in conditions you should always monitor Tooele County’s warning systems. This is called standing by for more information. Keep your TV or radio on and tuned to an Emergency Alert System station. (KSL 1160 AM or 102.7 FM) It is wise to also monitor social media from reputable sources such as Emergency Management or Police, Fire, and Health Agencies.
Get Involved
![]()
The most important way to be involved is to exercise and practice your family plan, keep your supplies updated and make sure everyone knows what they need to do before, during, and after a disaster. The most important people to be involved with is your family and your neighborhood.
Recognizing that preparedness is a shared responsibility, it calls for the involvement of everyone—not just the government—in preparedness efforts. By working together, everyone can keep the nation safe from harm and be resilient when struck by hazards, such as natural disasters, acts of terrorism, and pandemics.
The Whole Community includes:
 Individuals and families, including those with access and functional needs
Businesses
Faith-based and community organizations
Nonprofit groups
Schools and academia
Media outlets
All levels of government, including state, local, tribal, territorial, and federal partners
The whole community can participate in programs and activities to make their families, homes and communities safer from risks and threats. Community leaders agree the formula for ensuring a safer homeland consists of volunteers, a trained and informed public and private sector, and increased support of emergency response agencies during disasters. Major disasters can overwhelm first responder agencies, empowering individuals to respond appropriately will lend support.
It is important to understand that to be a spontaneous volunteer or give donations spontaneously hinders the recovery process. It is a good idea to be affiliated with a reputable response group so that you can help with the relief effort correctly. It is also a wise practice to be informed about what the needs actually are. Giving money to reputable organizations ensures that your dollars are being spent appropriately on needs, and is not sitting somewhere in a warehouse waiting to be sorted. Monetary donations don’t need to know a size or a color, it can be used for much more than stuff. It can be used toward real recovery.
The best way to help the whole community and your family is to practice how you would respond to a disaster as a family and as a neighborhood.
If plans aren’t practiced, the gaps are never found and recovery will take longer.
Practicing and Maintaining Your Plan
➤ Quiz family members often so they remember what to do.
➤ Conduct fire and emergency evacuation drills.
➤ Practice the earthquake “Drop, Cover, and Hold On” protective action. Register and participate in the statewide Shake Out day in April every year.
Have fun with preparing. Play games. Pretend there are zombies that are coming. Play the “what if…” game. Teach children skills that will help with your family response. Go Camping. Read novels and information books about preparedness. Try out your kits. Eat the food in your kits. Test them out and see if your family will really eat what is in their kit. Go to a practice shelter event. Take a tour of the Emergency Operations Center. Have a block party to get to know your neighbors and how you can help each other. Find ways to incorporate preparedness into every day life.
➤ Participate in community exercises and drills
➤ Replace stored water every year and stored food every six months.
➤ Test and recharge your fire extinguisher(s) per manufacturers’ instructions.
➤ Test your smoke detectors monthly and change the batteries at least once a year.
Your family preparedness is the most important part of the whole community concept because preparedness begins with individuals and families, and goes out from there. YOU have a great role and responsibility to play when it comes to recovery and resilience, not only for your family, but for your workplace, the community, and the neighborhood which you live in.
Tying it all together
After following the preparedness steps: Get Informed, Make a Plan, Make a Kit, and Get Involved, it is important to find out what you can improve upon and evaluate your efforts to make your personal recovery more successful.
Evaluation involves looking at performance to determine how it differs from expectations, and realizing strengths and opportunities for improvement. Improvement involves a little planning and implementing needed changes to align performance with your goals and objectives of your family preparedness. They should also be ongoing elements of your family’s and community’s overall preparedness effort.
Evaluation tells you whether your plans work. A plan may look good on paper, but until it is put into practice, you won’t really know whether your procedures are effective and feasible, and when family members and neighbors have been equipped with the capabilities they need to do the job of responding to an emergency. Objective evaluation lets you identify strengths and weakness of plans and actions and identifies potential problem areas that may have been overlooked.
This is a great time to ask yourself questions pertaining to your overall readiness.
- Can we implement our plan effectively if an actual disaster happened tomorrow?
- What are the lessons we have learned from exercising our plans, playing games, and learning more about preparedness?
- How can we better close the gaps that make us not as prepared as we want to be?
- What actions can we take to make our preparedness and response capabilities more efficient and effective?
Write down your answers and make an action plan of what you will work on before the next time you practice your plan.
When those questions are put to the test you will know how you, your family, and neighborhood will fare.
Preparedness is an ongoing process that should be continued to help instill a culture of preparedness within families and communities. There are so many resources that can be utilized to help with personal, family, workplace, worship, and community preparedness. Please take advantage of what is available to strengthen your family and neighborhood. Some Resource links can be found at the end of the guide and on www.tcem.org
Improving is the best part of the process because you can see where you have been and you can build better and stronger. When you take into account the lessons learned within the process, and start to share them and help others, a culture of preparedness can support neighborhood and whole community preparedness efforts and assists the Emergency Management process.
Ready Business
Being ready for a disaster is more than storing water and supplies. You also need to be financially ready. Starting early and having adequate insurance, a plan to pay your bills and access to your important records and accounts will help you get back on your feet faster and avoid problems with your credit when you need it most.
Americans at all income levels have experienced the challenges of rebuilding their lives after a disaster or other emergency. In these stressful circumstances, having access to personal financial, insurance, medical, and other records is crucial for starting the process of recovery quickly and efficiently. Taking the time now to collect and secure these critical records will give you peace of mind and, in the event of an emergency, will ensure that you have the documentation needed to start the recovery process without delay.
- Several factors should be considered as to how disasters will affect your family financially. You should be prepared to sustain yourself and your family away from your home for several days or, in a worst-case scenario, several weeks or even months. Be advised, government agencies may not be able to react as quickly as you think they should.
- Evacuation expenses include fuel, restaurants and your stay in hotels. When deciding how much cash to bring for each day, keep those items in mind and plan accordingly.
- Average pet boarding costs are different for each animal depending on size and special needs.
- You should budget enough money to pay for a month’s supply of prescription medicines.
- During a disaster, credit and other bank card use may be limited due to loss of power and other disaster-related factors. Get more cash than you think will be necessary. Get cash in small bills and change because most retailers will not give change back during a disaster.
In the event of an emergency or disaster, you are still responsible for paying your mortgage regardless of the condition of your house or its habitability. You are also responsible for paying your credit card and other bills. Failing to remain current with your payments could negatively affect your credit at a time when you need credit the most.
If an emergency or disaster causes you to lose income and you are unable to pay your bills, it is recommended that you call your card issuers as soon as possible and explain your situation. Many card issuers will work with you to establish a schedule to accommodate you and your personal situation in times of emergency.
For more information on Financial Preparedness visit https://www.ready.gov/financial-preparedness”https://www.ready.gov/financial-preparedness
Ready Seniors
Ready Sunday
Developing a congregational preparedness plan is a process. As with most processes, it is not always linear and neat but grows organically as the community discovers its gifts and call to preparedness over time. It is important to understand that Churches and Faith Based Groups have important roles in helping their congregation to prepare and also in the recovery process as well.
May faith based organizations have special skills and equipment that can help in certain areas of recovery. Working with Emergency Management faith based organizations can improve relationships and recovery efforts immensely. The resources below will help Ministers, Pastors, and Church Leaders help their congregation become better prepared and know what to do to help after a disaster as a community and as a faith based organization.
http://crcc.usc.edu/report/disaster-tips-sheets-on-engaging-faith-communities/resources-and-tools/
https://community.fema.gov/hazard/earthquake-en_us/be-smart?lang=en_US
https://disastersandfaith.com/
https://www.fema.gov/faith-resources
https://www.fema.gov/media-library/assets/documents/33007
Ready School
Ready Neighborhood
Neighbors Helping Neighbors
Neighbors Helping Neighbors is a simple way to prepare for emergencies such as an earthquake or other major disaster. It does not require any special expertise or knowledge – just a desire to help and be more prepared.
We invite you to meet with your neighbors to discuss these steps and follow them together. Making plans as neighbors allows help to be available immediately when the Professional First Responders are unable to come because EVERYONE needs help and they are taking care of other larger issues. Help will most likely come from neighbors who will need to rely on each other and rely on resources within the neighborhood.
Check out www.nhnpreparedness.com to learn how you can help your neighborhood by participating the block captain neighborhood communication program.
Being involved with your neighbors and neighborhood will ultimately help the recovery process for you and your family happen more quickly. This section developed by Neighbors Helping Neighbors, is a simple, quick glance preparedness plan based on what you need one month at a time. This plan will get you on your way to preparing for the unexpected and to be able to help your neighborhood family. Disasters don’t end in an instant so it is important to think about long term recovery and what that means for your neighborhood and community.
Month 1: Family Emergency Plan
Month 2: First Three Minutes
Month 3: First Three Hours
Month 4: First Three Days
Month 5: First Three Weeks
Month 6: First 3 months
Month 1: Family Emergency Plan
Your family may not be together when disaster strikes, so it is important to plan in advance. Ask these questions: How will you contact on another? How will you get back together? What should we do in different situations?
It is suggested that each family designate a person in another state as an emergency contact for all family members. Also exchange cellular, work, and home phone numbers, know the names and needs of each family member, and include pets. Also, be aware of neighbor’s special needs or medical requirements. Keep this information readily accessible, such as posting inside a pantry door or with your GO kit.
Where feasible, purchase battery operated family service radios and learn how to communicate with your neighbors.
Month 2: First Three Minutes
3-minute kits attached to each bed in the house filled with sturdy shoes, flashlight, sturdy gloves, whistle, and lightweight clothes will enable persons to walk across the floor with light in case there is debris and power is out.
Month 3: First Three Hours
The first three hours after a disaster are an important time to take stock of your situation. You might need to help a family member or neighbor who is injured. The most important item may be a well-stocked first-aid kit. Make sure you have adequate supplies, medications, and personal needs for each family member. Remember prescription medications! An AM/FM radio to listen for information from public safety agencies, supplies for needed rescue, and a binder with important documents should be accessed. Make sure you have extra batteries or a radio that runs off solar or a hand-cranked dynamo.
Month 4: First Three Days
If a disaster is large enough, it may cause interruption to community services over several days. Planning for the next three days will require you to organize food and water for family members. Here are some items you might need. Prepare a “72-hour kit” for each family member. Keep it packed and ready to “grab-and-go” at any time, in case you need to leave suddenly. Include water (at least 1 gallon per person per day), easy-to-prepare food items, clothing, shoes, first aid supplies, medications (including prescriptions), personal hygiene items, water filters or purification tablets, shelter and survival supplies, and cash in small denominations. Place these kits in an easily-accessible location in your home and show family members where they are stored.
Month 5: First Three Weeks
A major disaster may cause disruption of services like stores and utilities over an extended time. It’s time to prepare for the first three weeks. Don’t worry, it’s not as overwhelming as it might sound.
In addition to the supplies you’ve put away for the first three days, continue adding enough water, food, and personal items to last three weeks. The simplest way to accomplish this preparation is over time. Each time you go shopping, purchase a little extra of the same food and personal items you normally buy. For water storage, consider some larger containers, like 5-, 15-, 30-, or even 55-gallon water storage barrels. Also consider other cooking methods and power and fuel options that you will be able to use if the disruptions lasts longer than you think it might.
Month 6: First Three Months
Our next preparation time-period is the most daunting – three months. Hopefully, none of us will ever experience a post-disaster period where we need to rely on our own supplies for three months, but it could happen. Examples are a job loss, health problems, or loss of a family member. Never does anyone want this to happen, but if it does and you are adequately prepared the event won’t feel as stressful because you will have prepared in advance to take care of your family needs.
Continue to build up an adequate supply of food that is part of your normal, daily diet. Work toward storing enough to feed every family member for three months. Include a combination of basic food-storage staples (like flour, beans, and rice) as well as everyday food that is easily prepared. Build this supply up gradually, and you won’t be overwhelmed by the task.